


Welcome To the v2rayN Wiki!
v2rayN is a powerful, open-source GUI client designed for Windows, Linux, and macOS that provides seamless support for multiple proxy cores including Xray, sing-box, v2fly, and mihomo. As a versatile network routing tool, I’ve found v2rayN to be an essential solution for managing encrypted connections, bypassing internet restrictions, and maintaining online privacy across different platforms.
What sets v2rayN apart from traditional VPN clients is its rule-based routing system and multi-protocol support. Whether I’m configuring VMess, VLESS, Trojan, Shadowsocks, or SOCKS5 connections, v2rayN gives me complete control over how my internet traffic is routed. The application supports advanced features like TUN mode, custom DNS configuration, subscription management, and proxy chaining making it ideal for both casual users seeking privacy and technical professionals who need granular control over their network connections.
With its intuitive interface and extensive customization options, v2rayN has become the go-to proxy management tool for users who demand flexibility, security, and performance. This wiki serves as your complete guide to mastering every aspect of v2rayN, from basic installation to advanced routing configurations.
System Requirements and Prerequisites
Before installing v2rayN, I always ensure my system meets the minimum requirements to guarantee optimal performance.
Windows Requirements
- Operating System: Windows 7 SP1 or later (Windows 10/11 recommended)
- Architecture: 64-bit processor
- .NET Framework: Version 4.8 or later
- RAM: Minimum 2GB (4GB recommended)
- Storage: At least 100MB free space
Linux Requirements
- Distributions: Ubuntu 20.04+, Debian 10+, Fedora 35+, Arch Linux
- Architecture: x86_64 or ARM64
- Dependencies: libgtk-3, libwebkit2gtk-4.0
- RAM: Minimum 2GB
- Storage: 100MB free space
macOS Requirements
- Version: macOS 10.15 (Catalina) or later
- Architecture: Intel or Apple Silicon (M1/M2)
- RAM: Minimum 2GB
- Storage: 100MB free space
Network Prerequisites
When setting up v2rayN, I make sure I have:
- Active internet connection
- Valid proxy server details (server address, port, UUID, etc.)
- Administrative privileges for system-level configurations
Installation Guide
I’ve installed v2rayN across multiple platforms, and here’s my step-by-step process for each operating system.
Windows Installation
Step 1: Download v2rayN I visit the official GitHub repository and download the latest release package. I always choose the version that matches my system architecture (typically v2rayN-windows-64.zip).
Step 2: Extract Files After downloading, I extract the ZIP file to a permanent location. I prefer creating a dedicated folder like C:\Program Files\v2rayN to keep everything organized.
Step 3: Install .NET Framework If my system doesn’t have .NET Framework 4.8 or later, I download and install it from Microsoft’s official website before proceeding.
Step 4: Run v2rayN I launch v2rayN.exe as administrator (right-click → Run as administrator) for the first time. This ensures proper system integration and permission setup.
Step 5: Core Installation When I first launch v2rayN, it automatically detects if proxy cores are missing. I allow it to download and install the necessary cores (Xray or v2fly) from the built-in core management system.
Linux Installation
Step 1: Download Package I download the appropriate Linux package from the GitHub releases page. For most distributions, I use the AppImage version for portability.
Step 2: Make Executable
chmod +x v2rayN-linux-x64.AppImage
Step 3: Install Dependencies On Ubuntu/Debian, I run:
sudo apt install libgtk-3-0 libwebkit2gtk-4.0-37
On Fedora:
sudo dnf install gtk3 webkit2gtk3
Step 4: Launch Application
./v2rayN-linux-x64.AppImage
For permanent installation, I move it to /opt and create a desktop entry.
macOS Installation
Step 1: Download DMG I download the v2rayN-macos.dmg file from the official repository.
Step 2: Install Application After mounting the DMG, I drag v2rayN to my Applications folder.
Step 3: Security Settings Since v2rayN isn’t signed with an Apple Developer certificate, I need to:
- Open System Preferences → Security & Privacy
- Click “Open Anyway” when the security warning appears
- Or use Terminal:
xattr -cr /Applications/v2rayN.app
Step 4: Grant Permissions I allow v2rayN to access network settings when prompted during the first launch.
Initial Setup and Configuration
After installation, I follow these essential steps to configure v2rayN properly.
First Launch Configuration

When I open v2rayN for the first time, I’m greeted with a clean interface. Here’s what I configure immediately:
Language Settings I go to Settings → Language and select my preferred language (English, Chinese, Persian, etc.).
System Proxy Configuration I enable system proxy integration so v2rayN can automatically route all system traffic:
- Navigate to Settings → System Proxy
- Select “Set system proxy automatically”
- Choose appropriate proxy mode (PAC or Global)
Port Configuration I verify and adjust local listening ports if needed:
- HTTP Proxy Port: Default 10809
- SOCKS Proxy Port: Default 10808
- These ports should be free and not conflicted with other applications
Core Selection
v2rayN supports multiple proxy cores, and I select based on my needs:
Xray-core (Default)
- Most feature-rich and actively maintained
- Best compatibility with modern protocols
- My preferred choice for general use
v2fly-core
- Original V2Ray implementation
- Stable and well-tested
- Good for legacy configurations
sing-box
- Modern, high-performance core
- Excellent for mobile integration
- Great for advanced routing
I switch between cores from Settings → Core Type Selection.
Update Configuration
To keep v2rayN secure and functional, I enable automatic updates:
- Settings → Update Settings
- Enable “Check for updates on startup”
- Select update channel (Stable or Pre-release)
Understanding the Interface
v2rayN’s interface is divided into several key sections that I use daily.
Main Window Components
Server List Panel The central panel displays all my configured servers with columns showing:
- Server name/alias
- Server address and port
- Protocol type (VMess, VLESS, Trojan, etc.)
- Network type (TCP, WebSocket, gRPC)
- Latency (ping results)
- Upload/download speed
I can sort servers by clicking column headers and organize them into groups for better management.
Menu Bar The top menu provides access to:
- Server: Add, import, export, and manage servers
- Subscription: Manage subscription URLs
- Settings: Configure application preferences
- Routing: Set up custom routing rules
- Tools: Access utilities like speed test, DNS test
- Help: Documentation and about information
Status Bar At the bottom, I monitor real-time information:
- Current connection status
- Active protocol and server
- Upload/download statistics
- System proxy status
System Tray Icon When minimized, v2rayN sits in the system tray where I can:
- Quickly enable/disable proxy
- Switch between servers
- Change routing modes
- Access basic settings
Quick Actions
I’ve memorized these keyboard shortcuts for efficiency:
- Ctrl + P: Test server latency
- Ctrl + T: Test real connection speed
- Ctrl + C: Copy server configuration
- Ctrl + V: Paste server configuration
- Ctrl + S: Open settings
- Space: Enable/disable selected server
Adding and Managing Servers
I’ve found multiple ways to add servers to v2rayN, each suited for different scenarios.
Manual Server Addition

Adding VMess Server
When I have server details from my provider, I follow these steps:
- Click Server → Add VMess Server
- Fill in the configuration form:
- Alias: Friendly name for identification (e.g., “US-Server-01”)
- Address: Server IP or domain (e.g., example.com)
- Port: Server port (e.g., 443)
- User ID: UUID provided by server (e.g., 12345678-1234-1234-1234-123456789abc)
- Alter ID: Usually 0 for modern configurations
- Security: Encryption method (auto, aes-128-gcm, chacha20-poly1305)
- Network: Transport protocol (tcp, ws, h2, grpc, quic)
- Configure transport settings if using WebSocket or other protocols
- Click OK to save
Adding VLESS Server

VLESS is my preferred protocol for better performance:
- Server → Add VLESS Server
- Configure similar fields:
- Address and Port: Server details
- User ID: UUID from provider
- Flow: Leave empty for most configurations, or use xtls-rprx-vision for XTLS
- Encryption: Usually “none” for VLESS
- Network: Choose transport (tcp, ws, grpc, http)
- For XTLS configurations, I select appropriate flow control
Adding Trojan Server

When I use Trojan servers:
- Server → Add Trojan Server
- Fill in:
- Address and Port: Server endpoint
- Password: Trojan password from provider
- SNI: Server Name Indication (usually the domain)
- Allow Insecure: Only enable for testing, not production
Adding Shadowsocks Server
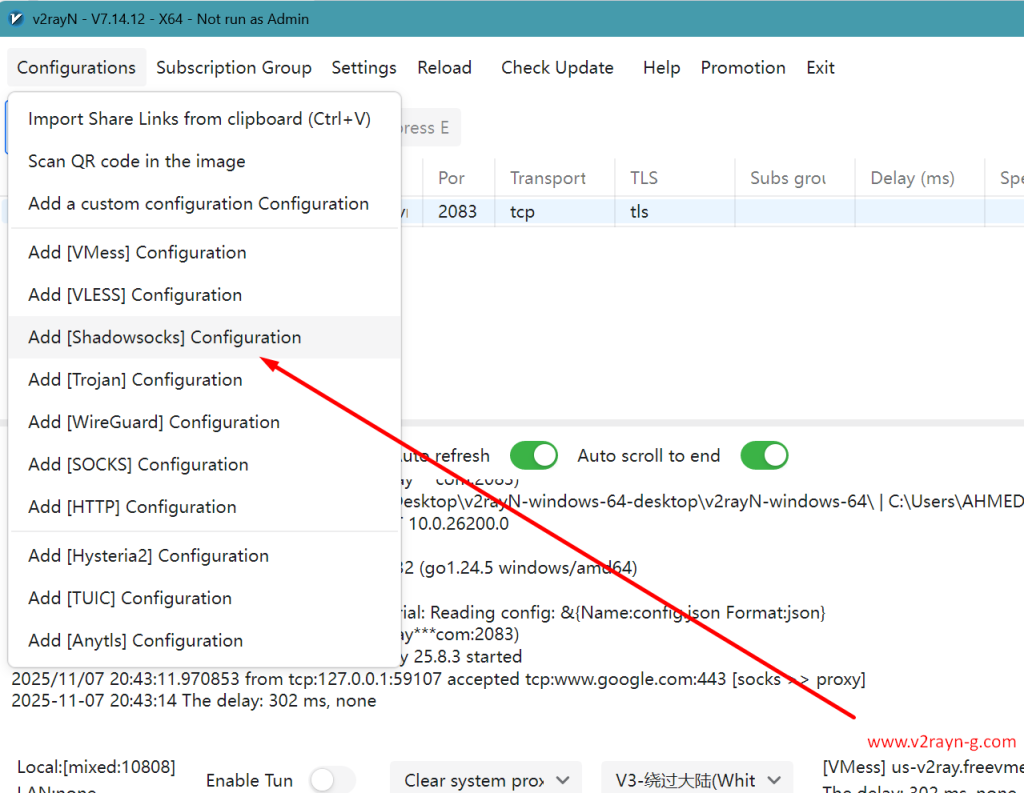
For Shadowsocks servers, I configure:
- Server → Add Shadowsocks Server
- Enter:
- Address and Port
- Password: Shadowsocks password
- Method: Encryption method (aes-256-gcm, chacha20-ietf-poly1305)
- Plugin: Optional (obfs, v2ray-plugin)
Importing Servers via URL
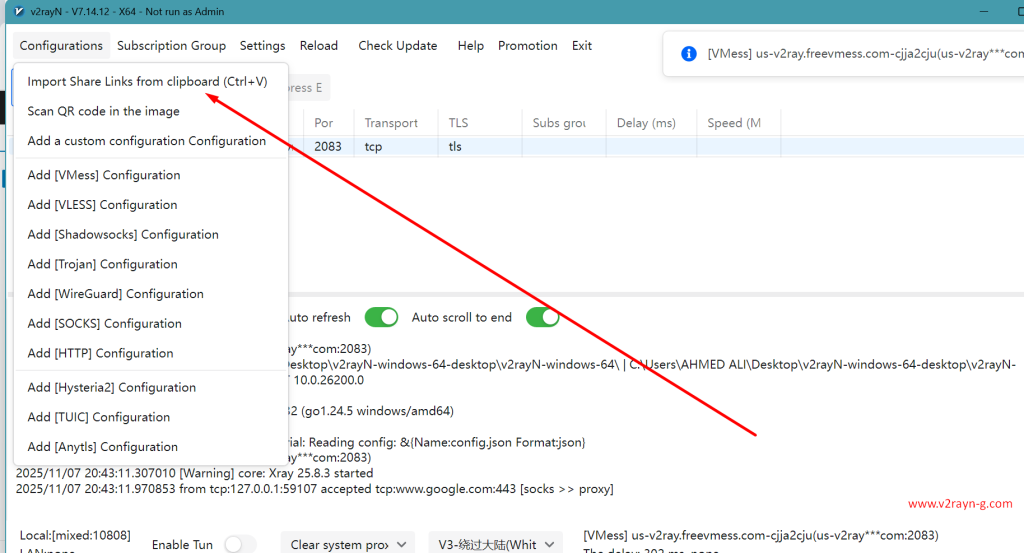
The fastest method I use is importing via subscription or share links:
Single Server Import
- Copy the server URL (vmess://, vless://, trojan://, ss://)
- Click Server → Import server from clipboard
- v2rayN automatically detects and configures the server
Batch Import
When I have multiple servers in a text file:
- Create a text file with one server URL per line
- Server → Import servers from batch
- Select the file and import all servers at once
Subscription Management
Subscriptions are my preferred method for managing multiple servers from a single provider:
Adding Subscription
- Click Subscription → Subscription Settings
- Click Add button
- Fill in:
- Alias: Subscription name
- URL: Subscription link from provider
- Auto Update: Enable for automatic updates
- Update Interval: Set to 24 hours typically
- Click OK to save
Updating Subscriptions
I update my subscriptions regularly:
- Subscription → Update subscription
- Or right-click on subscription group → Update
Managing Subscription Servers
After updating, I organize servers:
- Group servers by subscription
- Remove outdated or slow servers
- Pin frequently used servers to the top
Server Organization
To keep my server list manageable, I use these organization strategies:
Grouping Servers
- Select multiple servers (Ctrl + Click)
- Right-click → Move to Group
- Create or select existing group (e.g., “US Servers”, “Gaming”, “Streaming”)
Setting Favorites
I mark my most reliable servers:
- Right-click server → Set as favorites
- Favorites appear at the top of the list
Server Testing
Before using new servers, I always test them:
- Real Ping Test: Select server → Ctrl + P (tests latency)
- Real Speed Test: Ctrl + T (measures actual download/upload speed)
- URL Test: Tests connectivity to specific URLs
Protocol Configuration
Each protocol in v2rayN has specific configuration options that I optimize for different use cases.
VMess Protocol Deep Dive
VMess is the original V2Ray protocol I still use for many connections.
Security Settings
When configuring VMess security, I choose based on performance needs:
- auto: Let v2rayN choose (recommended for most users)
- aes-128-gcm: Good balance of security and speed
- chacha20-poly1305: Best for mobile devices and ARM processors
- none: Only for trusted networks (not recommended)
Transport Protocols
TCP Configuration
- Most basic and compatible
- I use HTTP header obfuscation for additional disguise:
Type: httpHost: www.example.comPath: /
WebSocket Configuration
- My go-to for firewall traversal
- Settings I use:
Path: /ray (or custom path from provider)Host: example.com - Enable TLS for secure WebSocket connections
HTTP/2 Configuration
- Excellent for multiplexing multiple connections
- I configure:
Host: example.comPath: / - Requires TLS to function properly
gRPC Configuration
- Modern transport with good performance
- Settings:
Service Name: GunService (or provider-specific)Multi Mode: Enable for better performance
TLS Settings
For all encrypted transports, I configure TLS carefully:
- Server Name (SNI): Must match server certificate
- ALPN: http/1.1, h2 for compatibility
- Allow Insecure: Never enable in production
- Certificates: Use system certificates unless custom required
VLESS Protocol Optimization
VLESS is my preferred protocol for performance-critical applications.
Flow Control
For XTLS-enabled servers, I select appropriate flow:
- xtls-rprx-vision: Latest and most secure XTLS implementation
- xtls-rprx-vision-udp443: For better UDP support
- Empty/None: Standard VLESS without XTLS
REALITY Protocol
When using VLESS REALITY (anti-censorship):
Target: www.microsoft.com (or other large CDN)
ServerNames: microsoft.com
PublicKey: [from server provider]
ShortId: [from server provider]
SpiderX: /path (optional)
Trojan Protocol Configuration
Trojan excels at mimicking HTTPS traffic.
Basic Settings
When I configure Trojan:
- Password: Use strong password from provider
- SNI: Critical for TLS handshake
- ALPN: h2, http/1.1 for proper HTTPS simulation
Transport Enhancement
I can layer additional transports over Trojan:
- WebSocket: Trojan over WS for additional obfuscation
- gRPC: Trojan over gRPC for CDN compatibility
Shadowsocks Configuration
Shadowsocks remains reliable for simple proxy needs.
Encryption Methods
I choose based on compatibility:
- aes-256-gcm: Most widely supported
- chacha20-ietf-poly1305: Best performance on modern systems
- 2022-blake3-aes-256-gcm: Newest, most secure (if supported)
Plugins
When needed, I use plugins:
- simple-obfs: HTTP/TLS obfuscation for basic firewall evasion
- v2ray-plugin: Full V2Ray transport options for Shadowsocks
Subscription Management
Subscription management is how I maintain updated server lists effortlessly.
Setting Up Subscriptions
Primary Subscription Configuration
When I add a new subscription source:
- Open Subscription → Subscription Settings
- Click Add to create new subscription
- Configure these fields:
- Remarks: Descriptive name (e.g., “VPN Provider Premium”)
- URL: Subscription link (always HTTPS)
- Enabled: Check to activate
- Auto Update: Enable for hands-free management
- User Agent: Leave default or customize if needed
Update Settings
I configure update behavior:
- Update Interval: 24 hours (balance between freshness and server load)
- Update on Startup: Enable so I always have latest servers
- Delete Old Servers: Enable to automatically remove deprecated servers
Advanced Subscription Features
Subscription Grouping
When managing multiple subscriptions:
- Create logical groups in subscription settings
- Assign different update schedules
- Apply group-specific routing rules
URL Conversion
If I receive incompatible subscription formats:
- Use Subscription → Convert subscription
- v2rayN can convert between different formats automatically
Filter Rules
I apply filters to subscription updates:
- Include Filter: Only import servers matching keywords (e.g., “US|UK|JP”)
- Exclude Filter: Skip unwanted servers (e.g., “CN|expired”)
- Regex Support: Use regular expressions for complex filtering
Subscription Troubleshooting
Update Failures
When subscriptions fail to update, I check:
- Network Connectivity: Ensure internet access
- URL Validity: Verify subscription link is correct
- Proxy Settings: Sometimes subscription update needs different routing
- Server Response: Check if provider’s subscription server is operational
Duplicate Servers
To handle duplicate servers after updates:
- Enable Remove duplicate servers in subscription settings
- v2rayN compares server addresses and ports to identify duplicates
Routing Rules and Traffic Management
Routing is where v2rayN’s true power shines. I use routing rules to control exactly how my traffic flows.
Understanding Routing Modes
Global Mode
When I enable global mode:
- All system traffic routes through proxy
- Simple but not always efficient
- Best for: Complete privacy, accessing blocked content
- I use this when traveling or on untrusted networks
PAC Mode (Proxy Auto-Config)
My default mode for daily browsing:
- Automatic rule-based routing
- Local/whitelisted sites connect directly
- Blocked/blacklisted sites use proxy
- Best for: Balanced performance and access
Direct Mode
All traffic bypasses proxy:
- Useful for testing or temporary direct access
- I switch here when troubleshooting connection issues
Custom Routing Rules
Domain-Based Rules
I create rules for specific domains:
- Open Settings → Routing Settings
- Add Rule → Choose Domain
- Configure:
Type: DomainPattern: netflix.comOutbound: Proxy
This ensures Netflix always uses my US proxy server.
IP-Based Rules
For IP address routing:
Type: IP
Pattern: 8.8.8.8/32
Outbound: Direct
I use this to route DNS queries directly for better performance.
Process-Based Rules
Application-specific routing (Windows only):
Type: Process
Pattern: chrome.exe
Outbound: Proxy
This routes only Chrome through proxy while other apps connect directly.
Advanced Routing Scenarios
Geographic Routing
I route traffic based on destination country:
Rule 1: Domain (geosite:cn) → Direct
Rule 2: Domain (geosite:geolocation-!cn) → Proxy
Rule 3: IP (geoip:cn) → Direct
Rule 4: IP (geoip:private) → Direct
This configuration:
- Chinese sites connect directly (faster)
- International sites use proxy
- Private IPs always direct
Split Tunneling
For complex setups, I split traffic:
Gaming Traffic (ports 3074, 27015-27030) → Low latency proxy
Streaming (netflix.com, hulu.com) → US proxy
Banking (bank domains) → Direct
Everything else → General proxy
GeoIP and GeoSite Data
Updating Geo Data
I keep geo databases current:
- Settings → Geo Files Management
- Update both geoip.dat and geosite.dat
- Check for updates monthly
Custom Geo Rules
Creating custom geographic rules:
- Download custom geosite/geoip files
- Place in v2rayN data directory
- Reference in routing rules:
geosite:custom-streaminggeoip:custom-regions
Routing Rule Priority
v2rayN processes rules from top to bottom. I order mine:
- Local/Private IPs → Direct (highest priority)
- Blocked Domains → Proxy
- Custom App Rules → Specific proxies
- Geographic Rules → Region-based routing
- Default Rule → Default outbound (lowest priority)
Traffic Statistics and Monitoring
I monitor routing effectiveness:
Real-time Statistics
- View active connections in status bar
- Monitor bandwidth per rule
- Identify which rules are most utilized
Traffic Analysis
From Tools → Statistics:
- Total bandwidth consumed per server
- Connection duration
- Protocol distribution
- Peak usage times
Advanced Features
v2rayN includes powerful advanced features I leverage for specialized scenarios.
TUN Mode Configuration
Enabling TUN Mode
- Settings → Core Settings → Enable TUN Mode
- Interface:
- Name:
v2ray-tun - MTU:
1500 - IP:
10.0.0.2/24 - DNS:
1.1.1.1, 8.8.8.8
- Name:
- Grant admin privileges if prompted
Benefits
- Captures all traffic (including DNS)
- Works with non-proxy-aware apps
- Better UDP handling
- Transparent proxying
TUN Mode Routing
0.0.0.0/0 → Proxy10.0.0.0/8 → Direct192.168.0.0/16 → Direct
DNS Configuration
DNS over HTTPS (DoH)
- Settings → Core Settings → DNS
- Primary:
https://1.1.1.1/dns-query - Secondary:
https://8.8.8.8/dns-query - Fallback:
https://dns.quad9.net/dns-query
- Primary:
DNS Routing Rules
geosite:cn → Direct DNS (223.5.5.5)geosite:geolocation-!cn → DoH via proxy- Default → DoH via proxy
FakeDNS
- Intercepts queries
- Returns fake IPs tracked internally
- Enables perfect domain-based routing with zero leaks
Proxy Chaining
Configuring Proxy Chains
- Add multiple servers → Settings → Core Settings → Multiple Outbounds
- Chain:
- Internet → Server 1 (Entry) → Server 2 (Middle) → Server 3 (Exit)
Use Cases
- Extra privacy (each hop sees limited info)
- Exit-location constraints
- Bypassing sophisticated analysis
Performance Considerations
- Each hop adds ~50–200 ms
- Bandwidth limited by slowest hop
- I limit chains to 2–3 hops max and only use when necessary
Load Balancing
Round-Robin Balancing
- Select multiple servers → Set as load balance group
- Strategy: Round-robin
- Health Check: Enabled (5 min interval)
Intelligent Balancing
- Prefer lowest latency server
- Distribute by current load
- Automatic failover on disconnect
Traffic Obfuscation
WebSocket Path Randomization
- Replace static
"/ray"with"/api/v2/ws/<random>"
Timing/Size Obfuscation
- Padding: random bytes
- Chunking: irregular sizes
- Delays: small randomized gaps
Multi-Core Configuration
Setup
- Settings → Core Type Selection → Enable Multiple Cores
- Assign:
- Xray-core: VMess/VLESS/Trojan
- sing-box: Shadowsocks/Hysteria/TUIC
Benefits
- Protocol-specific optimization
- Better resource utilization
- Isolation (one core crash doesn’t kill others)
Troubleshooting Common Issues
Connection Problems
Symptom: Cannot Connect to Server
My checklist:
- Test Latency:
Ctrl + P - Verify Config: address/port/UUID/transport
- System Proxy: PAC vs Global
- Firewall/AV: allow v2rayN & cores
- Core: update or switch (Xray ↔ v2fly)
Symptom: Slow Connection Speed
- Speed Test:
Ctrl + Tacross servers - Change Protocol: WS ↔ gRPC ↔ TCP (with/without TLS)
- Mux Tuning: enable/disable & adjust concurrency
- Routing: confirm intended path is used
DNS Issues
DNS Leaks
- Enable DoH
- Route DNS via proxy (or TUN)
- Test on
dnsleaktest.com
Cannot Resolve Domains
- Check DNS server & routing rules
- Try alternate DoH resolvers
- Flush cache (
ipconfig /flushdnson Windows)
Application-Specific Issues
Some Apps Don’t Use Proxy
- Enable TUN Mode
- Check app’s internal proxy settings (use SOCKS5
127.0.0.1:10808) - Add Process Rules for the app
System Proxy Issues
Proxy Settings Not Applied
- Manually set Windows Proxy:
- HTTP:
127.0.0.1:10809 - SOCKS:
127.0.0.1:10808
- HTTP:
- PAC syntax/location OK? Regenerate if needed
- Reset WinHTTP:
netsh winhttp reset proxy
Performance Issues
High CPU Usage
- Disable real-time stats & heavy logging
- Simplify routing rules
- Update cores
High Memory Usage
- Trim server list
- Limit subscriptions
- Tools → Clear cache and logs, restart
Core-Related Issues
Core Fails to Start
- Verify binaries exist; re-download
- Run as admin; check permissions
- Change ports if
10808/10809in use
Core Crashes
- Use stable versions
- Validate JSON & configs
- Disable experimental features
Log Analysis
- Tools → Open log folder (
error.log,access.log) - Increase log level to debug for detailed trace
- Common errors:
"connection refused"→ server down/blocked"timeout"→ wrong port/network issues"invalid UUID"→ credential mismatch"TLS handshake failed"→ SNI/cert problem
Performance Optimization
Through extensive testing and real-world usage, I’ve optimized v2rayN for both speed and stability.
Connection Optimization
Multiplexing (Mux)
- Settings → Core Settings → Mux
- Enabled: Yes
- Concurrency: 8 (my sweet spot)
Keepalive & Timeout
- Keepalive: 15–30s
- Timeout: 60–120s
Core Selection
- Xray-core: mixed environments
- sing-box: modern/UDP-heavy (Hysteria/TUIC)
- mihomo: rule-centric setups
Network Optimization
DNS Choices
- Primary DoH: Cloudflare
- Secondary: Google
- Fallback: Quad9
- Enable DNS caching where available
Routing Efficiency
- Put most-hit rules at top
- Keep ruleset lean
Geo Data Maintenance
- Update
geosite.dat/geoip.datmonthly
System & Resource Tuning
Reduce Background Load
- Disable auto speed tests
- Log level: Error
- Throttle UI refresh
Windows
- AV exclusions for
v2rayN.exe& core binaries - High Performance power plan
Linux/macOS
- Run with elevated perms for TUN
- Ensure
ulimit -n 65535
Security Best Practices
Protocol & Encryption
I prioritize protocols that balance speed, security, and detectability. Whenever I can, I use VLESS with XTLS/REALITY because it’s harder to fingerprint and performs well under censorship. If I need VMess, I stick to aid: 0 with modern scy ciphers and never use "security": "none" on untrusted networks.
- Prefer VLESS + XTLS/REALITY when available
- VMess with aid: 0, modern scy only
- Avoid “security”: “none” on public networks
TLS & Certificates
For TLS, I make sure the SNI exactly matches the certificate to avoid handshake errors and traffic anomalies. I keep Allow Insecure = false except during targeted testing, and I trust only the appropriate system or pinned roots to prevent MITM risks.
- SNI must match certificate
- Allow Insecure: false (except testing)
- Pin or trust appropriate roots
DNS Privacy
DNS is a common leak point, so I always use DoH/DoT instead of ISP DNS to keep queries encrypted end-to-end. After changes, I run DNS leak tests to confirm my resolver paths are going where I expect.
- Always DoH/DoT, not ISP DNS
- Verify with DNS leak tests
Updates & Hygiene
I treat updates as a security control: I update cores and geo files regularly and stick to stable releases for production use. Before big changes, I backup my configs so I can roll back instantly if something breaks.
- Update cores and geo files regularly
- Use stable releases for production
- Backup configs before major changes
Subscription Safety
Subscriptions are credentials—so I only use trusted providers and never share my URLs. If I suspect exposure, I rotate UUIDs and regenerate tokens to cut off unauthorized access.
- Only use trusted providers
- Don’t share subscription URLs
- Rotate UUIDs if compromised
System Hardening
I run v2rayN as a standard user unless TUN needs admin rights, and I close unused ports to shrink the attack surface. Strong local passwords plus 2FA on provider dashboards give me an extra layer of protection.
- Run as standard user unless TUN needs admin
- Close unused ports
- Use strong passwords and 2FA where applicable
Conclusion
Over time, mastering v2rayN has given me full control over my network privacy and traffic routing. From clean installation and smart subscriptions to precise routing and TUN-level capture, every feature in v2rayN is built for flexibility and performance. By following these configurations, performance tweaks, and security practices, I’ve turned v2rayN into a professional-grade, private, and efficient proxy management solution across all my devices.